When working with AWS sagemaker for machine learning problems, you may need to store the files directly to the AWS S3 bucket.
You can write pandas dataframe as CSV directly to S3 using the df.to_csv(s3URI, storage_options).
In this tutorial, you’ll learn how to write pandas dataframe as CSV directly in S3 using the Boto3 library.
Table of Contents
Installing Boto3
If you’ve not installed boto3 yet, you can install it by using the below snippet.
Snippet
%pip install boto3Boto3 will be installed successfully.
Now, you can use it to access AWS resources.
Installing s3fs
S3Fs is a Pythonic file interface to S3. It builds on top of botocore.
You can install S3Fs using the following pip command.
Prefix the % symbol to the pip command if you would like to install the package directly from the Jupyter notebook.
Snippet
%pip install s3fsS3Fs package and its dependencies will be installed with the below output messages.
Output
Collecting s3fs
  Downloading s3fs-2022.2.0-py3-none-any.whl (26 kB)
Successfully installed aiobotocore-2.1.1 aiohttp-3.8.1 aioitertools-0.10.0 aiosignal-1.2.0 async-timeout-4.0.2 botocore-1.23.24 frozenlist-1.3.0 fsspec-2022.2.0 multidict-6.0.2 s3fs-2022.2.0 typing-extensions-4.1.1 yarl-1.7.2
Note: you may need to restart the kernel to use updated packages.
Next, you’ll use the S3Fs library to upload the dataframe as a CSV object directly to S3.
Creating Dataframe
First, you’ll create a dataframe to work with it.
- Load the iris dataset from sklearn and create a pandas dataframe from it, as shown in the below code.
Code
from sklearn import datasets

import pandas as pd

iris = datasets.load_iris()

df = pd.DataFrame(data=iris.data, columns=iris.feature_names)

df
Now, you have got the dataset that can be exported as CSV into S3 directly.
Using to_CSV() and S3 Path
You can use the to_csv() method available in save pandas dataframe as CSV file directly to S3.
You need to below details.
- AWS Credentails – You can Generate the security credentials by clicking Your Profile Name -> My Security Credentials -> Access keys (access key ID and secret access key) option. This is necessary to create session with your AWS account.
- Bucket_Name – Target S3 bucket name where you need to upload the CSV file.
- Object_Name – Name for the CSV file. If the bucket already contains a CSV file, then it’ll be replaced with the new file.
Code
You can use the below statement to write the dataframe as a CSV file to the S3.
df.to_csv("s3://stackvidhya/df_new.csv",
          storage_options={'key': '<your_access_key_id>',
                           'secret': '<your_secret_access_key>'})

print("Dataframe is saved as CSV in S3 bucket.")
Output
Dataframe is saved as CSV in S3 bucket.Using Object.put()
In this section, you’ll use the object.put() method to write the dataframe as a CSV file to the S3 bucket.
You can use this method when you do not want to install an additional package S3Fs.
To use the Object.put() method,
- create a session to your account using the security credentials.
- With the session, create an
S3resource object.
Read the difference between Session, resource, and client to know more about session and resources.
- Once the session and resources are created, write the dataframe to a CSV buffer using the
to_csv()method and pass aStringIObuffer variable. - Create an S3 object by using the
S3_resource.Object() - Write the CSV contents to the object by using the
put()method.
Code
The following code demonstrates the complete process of writing the dataframe as CSV directly to S3.
from io import StringIO

import boto3


#Creating Session With Boto3.
session = boto3.Session(
aws_access_key_id='<your_access_key_id>',
aws_secret_access_key='<your_secret_access_key>'
)

#Creating S3 Resource From the Session.
s3_res = session.resource('s3')

csv_buffer = StringIO()

df.to_csv(csv_buffer)

bucket_name = 'stackvidhya'

s3_object_name = 'df.csv'

s3_res.Object(bucket_name, s3_object_name).put(Body=csv_buffer.getvalue())

print("Dataframe is saved as CSV in S3 bucket.")
Output
Dataframe is saved as CSV in S3 bucket.This is how you can write a dataframe to S3.
Once the S3 object is created, you can set the Encoding for the S3 object.
However, this is optional and may be necessary only to handle files with special characters.
File Encoding (Optional)
Encoding is used to represent a set of characters by some kind of encoding system that assigns a number to each character for digital/binary representation.
UTF-8is the commonly used encoding system for text files.- It supports all the special characters in various languages such as German umlauts Ä.
- These special characters are considered Multibyte characters.
When a file is encoded using a specific encoding, then while reading the file, you need to specify that encoding to decode the file contents to read special characters without problems.
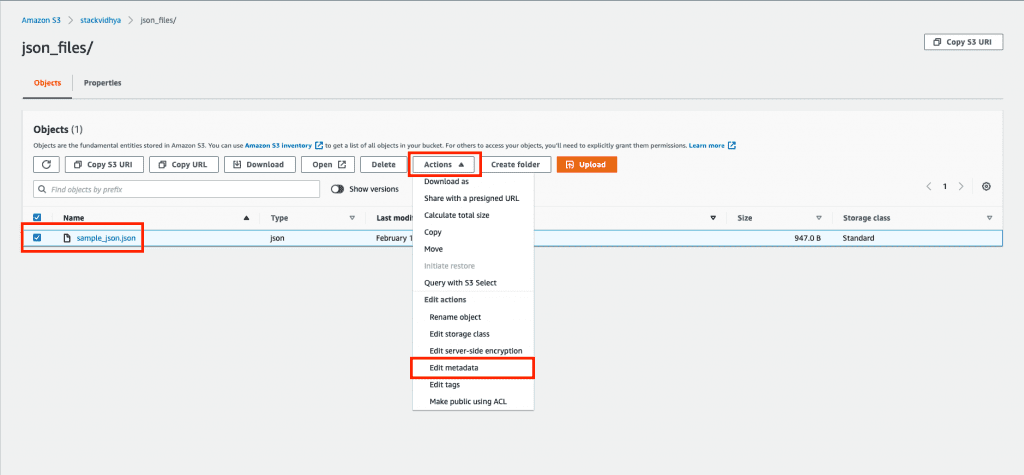
When you store a file in S3, you can set the encoding using the file Metadata option.

Edit metadata of file using the steps shown below.
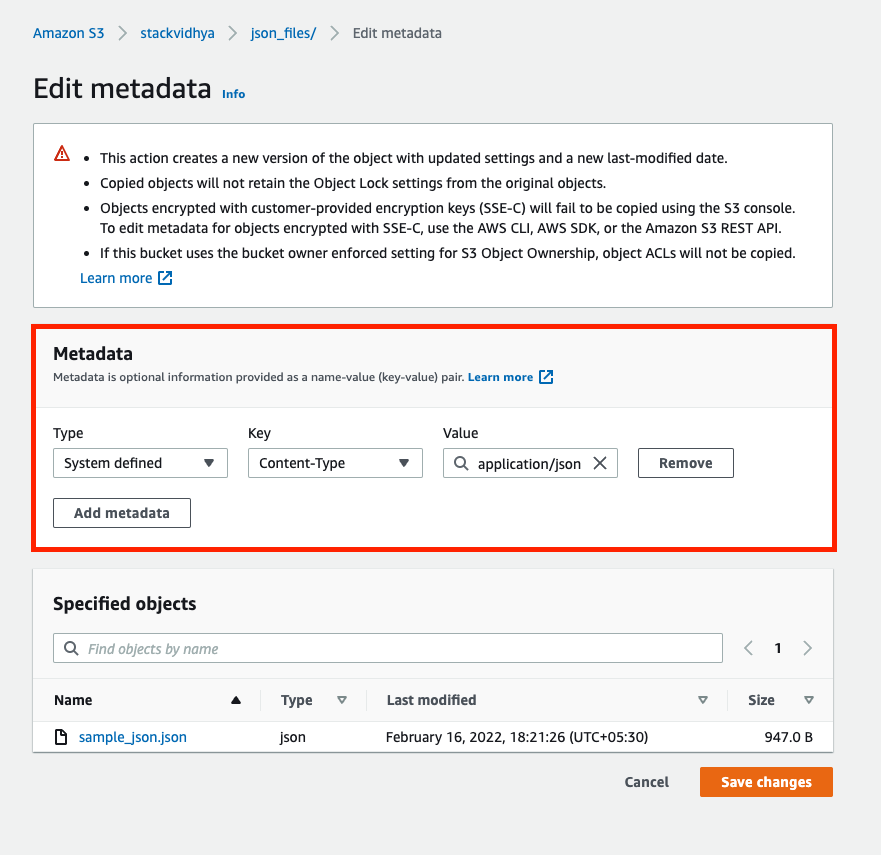
You’ll be taken to the file metadata screen.

The system-defined metadata will be available by default with key as content-type and value as text/plain.
- Add the encoding by selecting the Add metadata option.
- Select System Defined Type and Key as content-encoding and value as
utf-8 or JSONbased on your file type.
This is how you can set encoding for your file objects in S3.

